Vivado Design Suite User
Guide Using
Constraints(UG903)
Xilinx 建議把timing constraint 與physical constraint 分開放在兩個sdc裡面,也可以同時設定多個constraint set,用設定target來指定目前使用的constraint,注意ip所使用的constraint會出現在ip自己的project裡面,不會出現在top level
Xdc file 也可以設定屬性,彈性的應用在synthesis或是implementation(在source file property), 也可以在tcl中設定在synthesis前或synthesis後
在xdc中下的constraint需要依照下面的順序來寫, 在clock之前所設的constraint會變成error且會被忽略, 不同的constraint file不能具有相依性,如果兩個constraint file具有相依性,可以將其依照順序合寫成一個,或是分割成多個然後依照順序排列
Timing constraint要被排在第一位,並設為target
在IP core裡面的constraint, 其比user constraint 先讀入,以便做為reference, IP core 也可以設定physical constraint,但是後來還是會被user constraint 覆寫, 例外情況為如果ip core引用clock object,其被user constraint 或是其他ip core所產生,則不會優先讀入, 譬如( for example, get_clocks -of_objects [get_ports clka])
在每個xdc 的 file property中都可以選processing_order, 這個order只能在import或是create IP cores時決定,project建立以後即不能再更改.
User constraint與IP constraint 的前後關係需如下
IO跟Clock Planning可以從Layout-> I/O Planning/ Clock Planning來看
如果用constraints wizard來建立constraint,裡面就會自動排列正確的順序,但是如果要改的話,最好使用edit timing constraint來更改,如果有時候用手動更改,有時候用edit timing constraint,可能會造成系統混淆
注意 : 更改constraints以後,除了apply以外,一定要按Save鍵,不然constraint不會被更改
IP的constraint不能被更改或是刪除,要把其disable,然後把ip constraint的內容複製到user constraint中,才能被修改
Timing
constraint 用在synthesis, physical and configuration constraint 用在implementation,
第一次建立xdc應該先簡單寫最上層的constraints,之後合成以後在慢慢調成符合timing
requirement
Do
not attach constraints to nets connecting combinatorial logic operators.
They
will likely be merged into a LUT and disappear from the netlist.
在網路上找到一個解釋set_false_path,
set_multicycle_path,與max&min_delay 的部落格(在reference中),講解的太棒了,讓我一看就懂了
以下截取部落格內容
下面三個constraint是跳脫STA所產生的特殊情形
set_false_path :
表示這路徑雖然存在,但是不會有人走過, 一旦路徑被設為false
path, 不管slack為證或
是為負,STA將不再回報,最常碰到的狀況是用來決定工作或是測試狀態的register(configuration register),所有系統的狀態都要等configuration
register定値了以後才會動作,時脈路徑是存在的,也有信號傳輸,但是不需要達成timing上的要求,另一種狀況是兩個不同的clock
domain之間,信號只需要傳輸,不需要及時,這種狀況要寫兩個constraint表示雙向,或是信號在兩個mux之中傳遞,以上這些狀況可以將其設回false
path
Xilinx官方解釋,設false path 的基本條件
(1)
Is not functional
(2) Does not need to
be timed
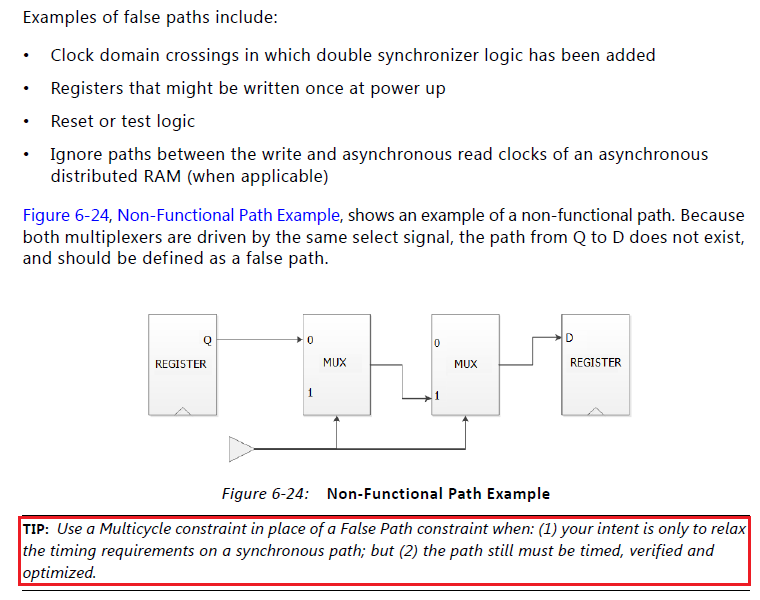
例如下面這些例子
set_multicycle_path : 見部落格的精闢叫車比喻,要小心本來應該設set_multicycle_path的路經被設為false path
如果一條timing path被重複設定,false path優先multicycle path,在優先於max&min delay